
The goal of this project was to replace the insecure (see references below) operating system on a WD MyCloud EX2 NAS device with a newer Linux Kernel and a custom boot installation that enables minimally SSH and allows alternative application or file hosting capabilities
It worked but took quite a few steps. 🙂
BOM
- WD MyCloud EX2 /w 2x 2TB disks (Craigslist, $60)
- DTech USB to TTL Serial Adapter Cable (Amazon, $14)
- SATA/IDE to USB 3.0 Adapter /w Power Supply (Amazon, $24)
The NAS contained 2x 2TB SATA disks which were reused, wiped and used to install the new kernel and root filesystem. The serial console cable was used to reprogram the bootloader, while the USB-SATA adapter was used to access and customize the drives for this project.
References
- https://krebsonsecurity.com/2021/07/another-0-day-looms-for-many-western-digital-users/
- https://www.theverge.com/2021/7/2/22561140/wd-cloud-os-3-security-flaw-update-patch-disconnect
Hardware Access to Boot Console
The first step involves disassembling the device to get access to the serial console of the bootloader and soldering some pins on the motherboard to be able to connect a USB-to-Serial adapter so one can reprogram the default boot setup.
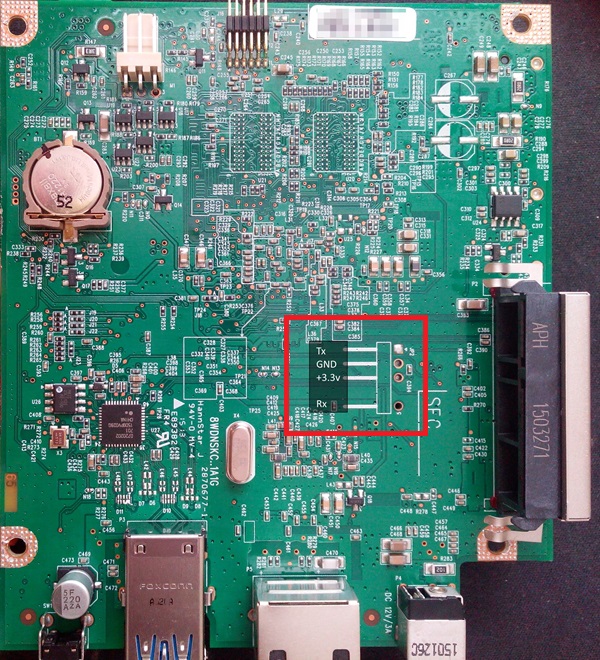
The serial console pin layout and mapping to the DTech cable is as follows:
Pin 1 - Tx --> USB Green Rx
Pin 2 - Gnd --> USB Black Gnd
Pin 5 - Rx --> USB White Tx
Install and Configure Minicom
The functionality of the serial connection was verified with a terminal on a Linux Laptop running Debian which supports the USB-to-Serial adapter out of the box.
apt-get install minicom
minicom -s
and setup to:
E - Bps/Par/Bits : 115200 8N1
F - Hardware Flow Control : No
G - Software Flow Control : Yes
Test Serial Connection
Run lsusb to see if the interface was attached.
lsusb
Connect minicom to the serial interface and power-cycle the NAS; the bootloader text should appear, and one can access the boot console by pressing a key.
Alternatives
One can also use PuTTY directly from Windows as well.
References
USB On WSL (Prerequisite)
Since my primary development desktop is a Windows machine, the next steps are performed to be able to continue all work (cross-compiling custom kernel, building a custom root filesystem) from the more powerful Windows desktop under WSL2.
In order to get the same serial console access as above (without using PuTTY), a custom WSL2 kernel with support for the USB Generic Serial Drivers and the SATA cable hardware needs to be created and installed.
References
- https://devblogs.microsoft.com/commandline/connecting-usb-devices-to-wsl/
- https://9to5tutorial.com/using-a-usb-serial-device-from-a-wsl2-environment
Install WSL
Follow instructions on https://learn.microsoft.com/en-us/windows/wsl/install to install WSL2 Debian
Continue work as root user:
sudo su -
Update the WSL Kernel
The following steps are used to compile a new custom Linux kernel for WSL under WSL.
In WSL
apt install libncurses5-dev git bc
apt install build-essential flex bison libssl-dev libelf-dev libncurses-dev autoconf libudev-dev libtool python3
apt install dwarves
Get kernel version:
uname -r
Get kernel sources:
git clone https://github.com/microsoft/WSL2-Linux-Kernel.git
cd WSL2-Linux-Kernel
git checkout linux-msft-wsl-5.15.90.1
Configure kernel sources:
cp /proc/config.gz config.gz
gunzip config.gz
mv config .config
Check that CONFIG_USB=y is set in .config
Check that CONFIG_EXT4_FS_POSIX_ACL=y is set in .config
make menuconfig
Enable Device Drivers -> USB Support -> USB Mass Storage Support [*]
Enable Device Drivers -> USB Support -> USB Serial Converter support – USB Serial Console device support [*]
Enable Device Drivers -> USB Support -> USB Serial Converter support – USB Generic Serial Driver [*]
+ drivers (i.e. Prolific PL2303 Driver)
Compile kernel:
make -j 8 olddefconfig
make -j 8
make -j 8 install
make -j 8 modules
make -j 8 modules_install
Enable new kernel image for WSL:
cp arch/x86/boot/bzImage /mnt/c/Users/[USERNAME]/bzImage
joe /mnt/c/Users/[USERNAME/.wslconfig
and edit to custom kernel image:
[wsl2]
kernel=c:\\users\\[USERNAME]\\bzImage
Close all WSL terminals, and run admin powershell console:
wsl --shutdown
then launch new Debian terminal.
On Windows
From elevated command prompt, run usbipd to get the bus ID:
usbipd list
…
2-3 067b:23a3 Prolific PL2303GC USB Serial COM Port (COM3) Not shared
…
usbipd wsl attach --busid 2-3
In WSL
With the NAS attached, run through the same procedure “Install and Configure Minicom” and “Test Serial Connection” as above.
USB Mass Storage on WSL2
Since one needs to repartition and store new files on the existing NAS disks they need to be removed from the NAS and connected to the PC. An external USB-SATA adapter was used, so one needed to also enable USB mass-storage on WSL as per the following steps.
References
- https://learn.microsoft.com/en-us/windows/wsl/wsl2-mount-disk
- https://github.com/jovton/USB-Storage-on-WSL2
On Windows
Install latest version of usbipd-win from https://github.com/dorssel/usbipd-win/releases/tag/v3.0.0
Attach external drive.
From elevated commandline run:
usbipd list
and attach USB device(s) to WSL2 with:
usbipd wsl attach --busid [BUSID]
In WSL
apt install build-essential flex bison libssl-dev libelf-dev libncurses5-dev git bc

apt-get install usbutils
apt-get install hwdata
apt-get install usbip
Run lsusb to see if the drive was attached:
lsusb
Check kernel logs for device name:
dmesg
[ 155.805108] sd 1:0:0:0: [sde] 30318592 512-byte logical blocks: (15.5 GB/14.5 GiB)
Cross-Compiling Kernel on WSL
The next step involves creating a custom ARM kernel for the NAS device on WSL2.
References
Install cross-compiling tools
apt update
apt upgrade
apt install build-essential u-boot-tools libncurses5-dev git bison flex bc libssl-dev
apt install crossbuild-essential-armhf
Prepare kernel sources
Get hardware patch configs:
git clone https://github.com/gisab/WDMC-Ex2.git
Pick up latest kernel 5.10 revision from: https://git.kernel.org/pub/scm/linux/kernel/git/stable/linux.git
cd WDMC-Ex2/3.Kernel
git clone --depth 1 --branch v5.10.[LATEST_REVISION] git://git.kernel.org/pub/scm/linux/kernel/git/stable/linux-stable.git linux-stable
Patch and compile custom kernel:
cd linux-stable
patch -p1 < ../gpio_trigger.patch cp ../kernel.config .config cp ../armada-370-wdmc-mirror-gen1-gs.dts arch/arm/boot/dts/ ----Compile kernel---- make ARCH=arm CROSS_COMPILE=arm-linux-gnueabihf- --jobs=8 olddefconfig make ARCH=arm CROSS_COMPILE=arm-linux-gnueabihf- --jobs=8 zImage make ARCH=arm CROSS_COMPILE=arm-linux-gnueabihf- --jobs=8 armada-370-wdmc-mirror-gen1-gs.dtb make ARCH=arm CROSS_COMPILE=arm-linux-gnueabihf- --jobs=8 modules mkdir -p ../output make ARCH=arm CROSS_COMPILE=arm-linux-gnueabihf- INSTALL_MOD_PATH=../output modules_install cp arch/arm/boot/zImage zImage_and_dtb cat arch/arm/boot/dts/armada-370-wdmc-mirror-gen1-gs.dtb >> zImage_and_dtb
mkimage -A arm -O linux -T kernel -C none -a 0x00008000 -e 0x00008000 -n Kernel-v5.10.[LATEST_REVISION] -d zImage_and_dtb uImage
cp uImage ~
Creating a RootFS on WSL
The next step is to create a minimal root filesystem.
References
Install tools
apt-get install binfmt-support qemu qemu-user-static binfmt-qemu-static debootstrap
Get default rootFS
cd ~
debootstrap --foreign --arch=armhf bullseye debianrootfs
cp /usr/bin/qemu-arm-static debianrootfs/usr/bin
cp /usr/bin/qemu-arm-static debianrootfs/bin
cp -r ~/WDMC-Ex2/3.Kernel/output/lib/modules debianrootfs/lib
Customize rootFS
/etc/init.d/binfmt-support restart
for f in dev dev/pts sys proc run ; do mount --bind /$f debianrootfs/$f ; done
chroot debianrootfs qemu-arm-static /bin/bash

/debootstrap/debootstrap --second-stage
passwd
adduser adminadmin
apt-get update
apt-get upgrade
apt -y install ssh openssh-server net-tools joe
apt-get install sudo ethtool resolvconf wget
apt-get install locales dialog
dpkg-reconfigure locales
apt-get install ntpdate
joe /etc/network/interfaces
Add:
auto lo
iface lo inet loopback
auto eth0
allow-hotplug eth0
iface eth0 inet dhcp
joe /etc/hostname
Change to:
myNAS
joe /etc/hosts
Add:
127.0.0.1 myNAS
joe /etc/fstab
Add:
/dev/sda2 / ext4 defaults,noatime 0
joe /etc/resolv.conf
Add (IP based on local LAN):
nameserver 192.168.0.1
echo T0:2345:respawn:/sbin/getty -L ttyS0 115200 vt100 >> /etc/inittab
exit
cd debianrootfs
tar cvzf ../debianrootfs.tar.gz .
cd ..
USB Boot Media On WSL (Install)
Now that both the custom kernel and a rootFS file are available, we need to copy it to a partition on the drive that will host these files in the NAS. Connect the drive to WSL, format and mount it, then copy the files.
mkdir /mnt/x
fdisk /dev/sdd
Delete all partitions, create 2 partitions, one for the kernel and the other for the root filesystem.
sdd1 - +100M - Linux (type: linux)
sdd2 - +16G - Linux (type: linux)
Device Start End Sectors Size Type
/dev/sdd1 2048 206847 204800 100M Linux filesystem
/dev/sdd2 206848 33761279 33554432 16G Linux filesystem
Create file systems on partitions, mount them and copy the kernel and filesystem onto them:
mkfs -t ext2 /dev/sdd1
mkfs -t ext4 /dev/sdd2

mount /dev/sdd1 /mnt/x
cp ~/uImage /mnt/x
umount /mnt/x

mount /dev/sdd2 /mnt/x
cd /mnt/x
tar xvzf ~/debianrootfs.tar.gz
cd
umount /mnt/x
Custom Bootloader Configuration
The final step is to get the NAS device to boot the custom kernel and mount the custom root filesystem. With the updated NAS drive inserted, boot the NAS and break into the bootloader via the serial console. Then configure the bootloader as follows:
Marvell>> ide reset
Marvell>> ext2ls ide 0:1
Marvell>> setenv bootcmd ide reset \; ext2load ide 0:1 0x500000 /uImage \; bootm 0x500000
Marvell>> printenv bootcmd
Marvell>> setenv bootargs root=/dev/sda2 console=ttyS0,115200 max_loop=32 usbcore.autosuspend=-1
Marvell>> printenv bootargs
Initial Login
Now reboot the NAS again. The serial console should now show the new Linux kernel booting and end on a login prompt.
Several manual post-install configurations are needed to arrive at a usable system.
Login as “admin” user:
su -
then run:
mount / -o remount,rw
joe /etc/fstab
Change
# UNCONFIGURED FSTAB FOR BASE SYSTEM
to
/dev/sda2 / ext4 defaults,errors=remount-ro 0 1
Reconfigure journaling:
joe /etc/systemd/journald.conf
and change
[Journal]
#Storage=auto
to
[Journal]
Storage=persistent
and reboot.
Login as “admin” user again:
su -
Set time and configure sources for a Debian update:
ntpdate 0.pool.ntp.org
joe /etc/apt-/sources.list
Edit to
deb http://deb.debian.org/debian bullseye main
deb-src http://deb.debian.org/debian bullseye main
deb http://deb.debian.org/debian-security/ bullseye-security main
deb-src http://deb.debian.org/debian-security/ bullseye-security main
deb http://deb.debian.org/debian bullseye-updates main
deb-src http://deb.debian.org/debian bullseye-updates main
deb http://deb.debian.org/debian bullseye main contrib non-free
deb-src http://deb.debian.org/debian bullseye main contrib non-free
deb http://deb.debian.org/debian-security/ bullseye-security main contrib non-fr
deb-src http://deb.debian.org/debian-security/ bullseye-security main contrib no
deb http://deb.debian.org/debian bullseye-updates main contrib non-free
deb-src http://deb.debian.org/debian bullseye-updates main contrib non-free
deb http://deb.debian.org/debian bullseye-backports main contrib non-free
deb-src http://deb.debian.org/debian bullseye-backports main contrib non-free
Update system and install a few utilities:
apt-get update
apt-get upgrade
apt-get install ntp
apt-get install parted
Fix partition:
parted
select /dev/sda
print
...enter "Fix" if requested...
quit
... repeat for /dev/sdb
Now, reboot NAS again. It should come up normally and can be used pretty much as a normal Linus system with – depending on the drive – plenty of space left for file storage.
Bootloader Reset
If one wants to revert to the original bootloader options, reset uBoot like this:
setenv bootcmd nand read.e 0xa00000 0x500000 0x500000 \; nand read.e 0xf00000 0xa00000 0x500000 \; bootm 0xa00000 0xf00000
setenv bootargs root=/dev/ram console=ttyS0,115200 max_loop=32
printenv bootcmd bootargs
saveenv
On the next startup, press and hold the reset button to revert the system to the default login (admin, no password).